WHAT MATERIALS WILL I NEED?
-Sterile petri dishes
-Dehydrated nutrient agar
-Distilled water
-Hot plate with stir capabilities
-Stir magnet
-Heat resistant gloves
-Goggles
-Optional: Autoclave and incubator
If you want to have accurate data, yes, your petri dishes need to be sterile.
Each year, I open a new sleeve of plastic petri dishes so I can assure they are sterile. If you don’t have access to new ones you can re-use petri dishes, but make sure to either sterilize them in an autoclave or clean them thoroughly in a bleach solution followed by a distilled water rinse.
HOW DO I MAKE AGAR PLATES?
Methods will vary slightly depending on the agar you ordered, (directions should come with your nutrient agar, or should be available online from the vendor) but here is the general process:
1. Measure out the desired amount of nutrient agar and distilled water and pour into a clean beaker. For the agar I order, the recipe calls for 23g of dehydrated agar per 1 liter of distilled water. (Note: 1 liter of agar will fill roughly 30 – 40 petri dishes).
2. Add a stir magnet to the beaker and place on your hot plate. Turn on both the heat and the stir settings.
3. Continue to heat and stir your agar until it is boiling. This may take a while, but be patient- if you don’t wait for it to boil, your agar won’t solidify once it cools.
4. If you don’t have access to a hot plate, you can use the microwave. Place beaker and agar mixture into the microwave and heat for 3 minutes. Continue heating in 1 minute bursts until the agar is completely dissolved and the mixture begins to boil.
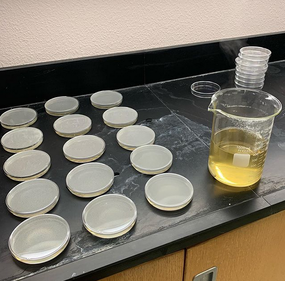
5. As you are waiting for the agar to boil, lay out your sterile petri dishes on a heat resistant counter. Keep the lids on as much as possible to avoid any contamination.
6. Once agar has come to a boil, remove from heat using heat resistant gloves. Lift the lid on a petri dish, carefully pour agar into the petri dish until it is roughly 2/3 of the way full, and promptly return the lid. Continue until all your agar has been used.
7. Allow the agar to solidify at room temperature- this shouldn’t take more than 15 minutes.
8. Once the agar has solidified and cooled, store them upside down in the fridge until you are ready to use them. Storing them upside down will ensure that any condensation drips onto the lid, not onto your agar.
HOW MANY DAYS BEFORE USE CAN I POUR THE PLATES?
I typically pour the petri dishes a day or two before I need them and store them in the fridge. Petri dishes in the fridge will be good for a few weeks before they begin to dry out, but the sooner you use them the better.
I HAVE 150 STUDENTS. HOW MANY PLATES WILL I NEED TO PREPARE?
It can be pricey to pour a ton of plates every year and with 150 students it would be way too expensive (and a lot of work!) to pour every student their own plate.
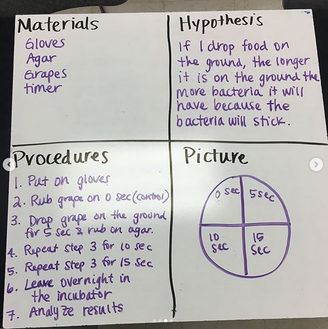
When I do this lab with my students, I put them in groups of 4. With roughly 32 students per class, I pour 8 plates per class. As a lab group I let them choose a variable to test and have them whiteboard their experimental design. Some groups want to change the amount of time the food is on the floor, other groups want to test different food types, and other groups want to try out different dirty surfaces. Once I’ve approved their design (to make sure they have a control) they can begin the lab.
DO I NEED AN INCUBATOR?
Okay, so your students set up the lab, but do you need to leave them in an incubator?
If you want quick results (overnight) then an incubator will speed up the process. But if you don’t have access to one, just let the plates sit for an extra day or two in your room temperature classroom and you will still get plenty of bacteria growth. Again, leave them upside down (agar side up) so you don’t have issues with condensation dripping into your agar.
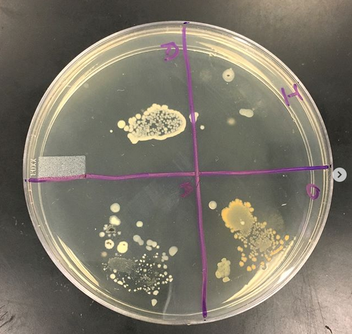
Since I do this lab the first week of school, this is an excellent time to review the difference between quantitative and qualitative data. Once students get their plates back, I have them make both qualitative observations and measure quantitative data.
You can have students collect quantitative data by counting colonies, but a much easier way is to use a grid and calculate percent coverage. You can purchase gridded stickers that stick onto your petri dish lids, or just do it yourself with a fine point sharpie marker. All students have to do is count the number of squares that have bacterial growth, divide it by the total number of squares, and multiply it by 100 to turn it into a percentage.
|

|
It is important you do not place your plates in the trash without first taking some precautions. While bacteria in small numbers may be harmless, once cultured into millions of cells they can pose a greater threat. There are a few ways to properly dispose of your used agar plates, depending on what you have available:
1. If you have an autoclave, you can autoclave your plates per the directions on your autoclave (generally at least 30 minutes).
2. If you used glass petri dishes and don’t have an autoclave, prepare a 20% bleach solution and spray your plates down. Allow the bleach to soak into the agar for 1 hour before placing agar in the trash. Then thoroughly clean your empty petri dishes again with a bleach solution and distilled water rinse.
3. If you used plastic petri dishes that you can afford to part with, you can place them in bio-hazard bags and have your district arrange for bio-hazard pick up. It doesn’t hurt to spray them down with a 20% bleach solution before placing them in bio-hazard bags.
I hope that answers all your questions! If you are interested in the lab handout I use with students to test the 5 second rule, you can find it HERE!